November 8, 2013

asparagus & mushroom risotto (+truffle oil)

I really enjoy rice dishes, so it shouldn't come as a surprise that asparagus and mushroom risotto is frequently prepared in my kitchen.  I am Asian after all.  Asians love rice.


This recipe is fairly simple and straightforward.  All it requires is a bit of prep work and some love.  

2 Tbsp oil (I use grapeseed oil)
2 cloves of garlic
1 bunch of asparagus
1 box of mushrooms (8oz - button, cremini, portobello...etc.)
Salt and pepper to taste
-------------------------
2 Tbsp butter
2 Tbsp oil 
1/2 cup chopped onion
1 cup arborio rice (yields ~3 cups cooked)
2 cans of 14oz chicken broth or vegetable broth
-------------------------
Infused white truffle oil (Buying truffle oil: examine label and make sure it's white truffle EXTRACT.  White truffle essence or white truffle aroma is synthetic and not worth your money!)
Parmesan cheese (freshly grated is best)


1.) Blanch the asparagus spears for 1-4 minutes, depending on the girth of the spears.  This is to soften the texture of the vegetable before fully cooking it.  Click here for how to: blanch asparagus.  My asparagus stalks were really thin, so one minute was enough.

2.) Cut the spears into one inch, bite size pieces.

3.) In a large pan, sauté the oil, garlic, and mushroom for 5 minutes.  Add asparagus and sprinkle with salt and pepper.  Sauté for another 5 minutes and set aside.


4.) In a pot, saute onion in butter and oil for about 3 minutes.

5.) Add rice and stir for about 2 minutes.


6.) Add 1/2 can of broth and continue stirring until liquid is absorbed.  This is where the love comes in.  Be prepared to stir a lot!  It'll help the risotto develop a creamy consistency and keep it from burning.

7.) Gradually stir in 1/2 cans of broth until you have no more broth left or until the rice reaches your desired consistency.  Keep stirring!  At the end, the rice should be fully cooked through and look creamy in texture.


8.) Add rice to the asparagus and mushroom mixture.  Combine, taste, and serve.  Add additional salt and pepper here if need be.


9.) (Optional) Just to add a bit of richness and luxury, I drizzle my bowl of risotto with some white truffle infused oil.  Two words: NEXT LEVEL.  

10.) (Optional) You can also grate some parmesan cheese over it, but I think it's ohmylish enough without it.


mànmàn chī,


....................................
let's chat on twitter:

'like' my facebook page:

see what i'm pinning:

follow me on instagram:
@cutiepiecook (my recipe collection)
@ohmylish (food & restaurant reviews)
@nowandjenn (beauty, fashion, lifestyle)

October 5, 2013

greek yogurt cream cheese

Greek yogurt is a staple in my kitchen, and I experiment with it A LOT.  My latest project was to see whether or not I could make homemade greek yogurt cream cheese out of this stuff.  I figured cream cheese wouldn't be too difficult to mimic since greek yogurt is already a bit tart and quite thick already.  Unfortunately, I couldn't find any recipes to go off of so here's to the first-ever homemade greek yogurt cream cheese recipe listed on the interwebs!


For one block or container of greek yogurt cream cheese, all you need is three ingredients:
1 cup Fage greek yogurt
1/3 cup sour cream
1/4 tsp salt

1.) Line a colander or sieve with a four layers of cheese cloths or in my case, flour sack towels for a budget friendly alternative.  Set colander or sieve over a bowl.  

If you don't have cheese cloths or flour sack towels, a few layers of those thick Viva paper towels or coffee filters will suffice.

2.) In a bowl, mix the greek yogurt and sour cream together.  

I chose Fage greek yogurt specifically for this recipe, because it's really thick and it's the least tart plain yogurt I have ever tried.  I usually can't eat plain yogurt, well plain, but Fage would be the exception.  Also, please use REAL sour cream for this recipe.  I know many of you will try to substitute a low-fat or fat-free variety of sour cream for this, but let me warn you, I have tried it and can assure you that it won't turn out the same.  I suppose the difference in consistency and taste isn't too discernible so some of you may not notice, but I definitely noticed and didn't like it too much.  Also, real sour cream is so much healthier for you too.  The lighter versions always contain so many harmful fillers, thickeners, and artificial flavors to compensate for the fat removed.  


3.) Scoop the greek yogurt/sour cream mixture into the cheese cloth.  

Make sure the whey is dripping off thin and translucent.  If it's thick and white, you may be losing too much curd and will need to and more layers of cloth in the colander.


4.) Fold the edges of cloth over the mixture and place a lid or saran wrap over the bowl.  Refrigerate and let it drain for the day or overnight.  

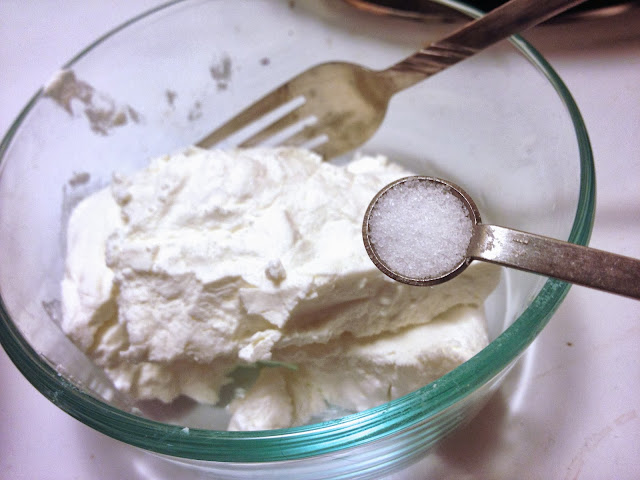
5.) Take bowl out of the fridge and check the consistency.  The mixture should be quite thick and some of the drained whey may have evaporated from the bowl.  Add salt to the cream cheese and combine thoroughly.

The salt really helps to enhance the flavor and marries fantastically with the slight tartness of the greek yogurt cream cheese.  I could have added more salt, but I watch my daily salt intake, so I held off a bit.  If you think it tastes bland, just increase the salt to 1/4 tsp in the recipe or sprinkle till your desired saltiness.  Just make sure the salt gets evenly incorporated.  Also, instead of adding more salt to boost the flavor, try enhancing the cream cheese by flavoring it with herbs and vegetables...even fruit if you like sweeter varieties of cream cheese.  I usually like adding a clove of minced garlic or mashed roasted garlic to the mix.  Kraft Philadelphia makes a chive and onion cream cheese that I crave every so often and that can easily be mimicked by adding one tablespoon of chopped chives and half a teaspoon of onion powder.  


6.) Smooth down the cream cheese and refrigerate.  It will stay fresh for up to 2 weeks.  


Now that I've mastered the greek yogurt cream cheese...my next experiment will be using greek yogurt to make cream cheese frosting!  Let me know if you want me to post the recipe!  It's going to be perfect for the autumn season...pumpkin bars and other ohmylish treats.  In the meantime, enjoy the greek yogurt cream cheese!  It's not Philadelphia cream cheese, but I actually like it a lot more!  Good luck!


mànmàn chī,


....................................
let's chat on twitter:

'like' my facebook page:

see what i'm pinning:

follow me on instagram:
@cutiepiecook (my recipe collection)
@ohmylish (food & restaurant reviews)
@nowandjenn (beauty, fashion, lifestyle)

August 29, 2013

homemade blackberry compote

My fridge was stocked with two 6 oz. containers of Driscoll blackberries and after eating about half of one container, I decided they were a bit too tart to keep eating fresh.  The blackberries obviously needed a heap of sweetness, so I thought, why not make some blackberry compote out of this!

I've actually never made compote before and was definitely a bit concerned about how this would turn out.  Typically, blackberries require a small addition of pectin (either in powder or liquid form or from another fruit that's high in pectin) to reach a gelatinous state, but I had read somewhere a while back that sour or under ripe blackberries contained more pectin than sweet blackberries.  With this knowledge, I thought I'd proceed and hoped that the tartness of my berries was an indication of high pectin levels.  I also figured, if all else fails, I'll just throw the compote mixture into a blender and make a fruit smoothie.
The recipe is pretty straightforward:
1 cup blackberries
2 Tbsp lemon juice
2 Tbsp water
1/4 cup sugar
Pinch of cinnamon

Directions:

1.) Place the blackberries, lemon juice, and water in a medium saucepan and bring to a boil over medium-high heat.  Reduce heat to medium-low and simmer until the berries have softened--3 to 4 minutes. 
2.) Stir in the sugar.  Increase heat to medium-high, and let the mixture return to a boil. Cook, stirring frequently, until the preserves start to thicken -- about 2 minutes.
3.) Take off the heat.  The preserves should appear quite gelatinous by now.  It can be immediately poured into a sterile jar with a tight seal and cooled to room temperature before heading to the fridge.  This will last a good 2-3 weeks in the refrigerator, but if you're anything like me, you'll gobble this up in a few days.  The recipe doesn't produce a high volume of preserves, so storing it in any clean container, preferably glass, will do.  It will be eaten before it goes bad anyway, so I just poured the preserves in a round Pyrex container and called it a day.

For those of you who want to make compote or preserves with something other than blackberries, 
here's a quick guide to some high and low pectin fruits:

High Pectin Fruits:
Apples (sour)
Blackberries (sour)
Boysenberries
Citrus fruits (especially in the peels of lemons and oranges)
Crabapples
Cranberries
Currants
Gooseberries
Grapes (Eastern Concord)
Loganberries
Plums (not Italian)
Quinces

Low Pectin Fruits:
Apricots
Blueberries
Figs
Grapes (Western Concord)
Guavas
Nectarines
Peaches
Pears
Plums (Italian)
Raspberries
Rhubarb
Strawberries
Sweet cherries

Instead of adding commercially prepared pectin to low pectin fruits as a thickening agent, you can always add apple pomace and/or citrus peels to your low pectin concoctions.  It doesn't affect the taste at all and is a natural, cost-effective solution to the problem.  Pectin is expensive!


My frugal self is also happy to say that I don't think I'll ever buy a jar of preserves again.  Who knew it could be this easy!  Have you guys ever made compote or preserves?  What are your favorite fruits to use?  Sound off in the comments below!


mànmàn chī,


....................................
let's chat on twitter:

'like' my facebook page:

see what i'm pinning:

follow me on instagram:
@cutiepiecook (my recipe collection)
@ohmylish (food & restaurant reviews)
@nowandjenn (beauty, fashion, lifestyle)

August 26, 2013

classic margherita pizza

With tomato season coming to an end, I'm finding any and every excuse to incorporate this fruitable (fruit commonly mistaken for a vegetable) into all my meals.  One of my favorite quick and easy meals to make is the classic Margherita pizza.  I just love how simple and distinct the flavor profile is for this pizza.  The divine combination of tomato, basil, and garlic work wonderfully in unison to complement each other.


Though I wish I could make this totally from scratch, I just don't have time for all that during a hectic school week.  My schedule usually leaves me feeling crunched for time which always has me searching for short cuts in my cooking.

My shortcut in this case was to use store bought, ready-made thin crust cheese pizza.  It provides a blank canvas for a multitude of different ingredients.  My favorites being tomato, sweet italian basil, and garlic.

Today, I used fresh vine tomatoes from the farmer's market and home-grown sweet italian basil.  The garlic was store bought.  First, I roughly minced the garlic and sprinkled that on the cheese pizza.  Next, I sliced the tomatoes to my preferred thickness (about 1/8 to 1/4 of an inch) and distributed them evenly across the pizza.  I also sprinkled the pizza with some italian seasoning here.

(pre-oven) Margherita pizza in the works...

[[TIP]] You must sandwich the garlic between the cheese and the tomatoes for two reasons: 1) The garlic oils being released during mincing and heating in the oven are purposely trapped in between to allow maximum seepage into the cheese, pizza sauce, and tomatoes. 2) It keeps the garlic from burning in the oven.  Also, if you're not a big fan of large slices of tomato, you can dice the tomatoes instead.

My thriving basil plants!

The rest of the steps are as follows:  Bake the pizza for the recommended time or close to your desired doneness.  Turn off the oven and take the pizza out.  Rough chop some sweet italian basil and sprinkle it on top of the pizza.  Drizzle a bit of extra virgin olive oil on the pizza as well.  I usually throw the pizza back in the warm oven for another minute or two to warm up the basil and extra virgin olive oil.  And voila, dinner is served in a matter of 15-20 minutes!  Yum!!

What are your favorite pizzas and pizza recipes?!  Sound off in the comments below!  I would love to try a new recipe :)


mànmàn chī,


....................................
let's chat on twitter:

'like' my facebook page:

see what i'm pinning:

follow me on instagram:
@cutiepiecook (my recipe collection)
@ohmylish (food & restaurant reviews)
@nowandjenn (beauty, fashion, lifestyle)

August 25, 2013

hello.

This is my first official blog post for Cutie Pie Cook, and I couldn't be more excited right now.  Take some time to read the "About" section and check out my other social media links.  I hope we can get well-acquainted with one another and become Internet friends.  Feel free to use the comments section below to sound off on anything you'd like.  Also, I would love if you share your most loved recipes with me, so don't hesitate to shoot me an email (cutiepiecook.jenn@gmail.com).

 
....................................
let's chat on twitter:

'like' my facebook page:

see what i'm pinning:

follow me on instagram:
@cutiepiecook (my recipe collection)
@ohmylish (food & restaurant reviews)
@nowandjenn (beauty, fashion, lifestyle)
Related Posts Plugin for WordPress, Blogger...